Abstract
XForms [XF1][XF2] is a
declarative programming language, with a different programming paradigm
compared to traditional programming languages.
Since it requires a new way of thinking about programming, learning
materials are paramount for people wanting to use the language and understand
its benefits.
This talk discusses the method used to build a hands-on tutorial for XForms,
using XForms, with the decisions taken, the techniques used, and the benefits
that the approach gave.
Keywords: XForms, Tutorial, design
Tutorials
Challenging, for attendees and tutors:
- time is limited
- there is far more material than can be taught in the time.
Choices:
- deep and narrow, a subset of the material in detail
- broad and shallow, overview of the whole, with less detail
- teaser to tempt to later self-study
- starter, giving a working knowledge of some of the material.
Method of presentation:
- lecture style, permitting more coverage
- hands-on, more direct acquaintance with the material, but reduced
coverage.
Top-down, or bottom-up?
XForms Tutorials
Most XForms tutorials [e.g. tut1, tut2]
had been lecture-style, covering most of the language.
However, a request for a hands-on tutorial motivated a new approach.
Design
To optimise time, attendees shouldn't be required to start from scratch,
since precious time is lost dealing with trivial issues like set up and syntax.
Exercises should require a change to an existing, working, example, using
the newly-acquired knowledge.
Advantages:
- hands-on
- minimal trivial administrative details
- larger working examples right from the start.
Form
Rapid-fire sequence of exercises, each consisting of 5 minutes of
presentation, followed by 5 minutes of coding.
This also maximises attendees' concentration, thanks to the recurrent
switching of activities.
The exercises are mostly cumulative, building on earlier ones.
At the end the attendee has a handful of small, useful, applications.
Designed to be part of a live event, but also supports self-study.
Not only about XForms, but is also built in XForms, giving
surprising possibilities.
Content
First task: identify topics to be taught.
In this case, involved running through the headings of the XForms
specification, and selecting topics.
Naturally enough, a structured XML document listing those topics, and their
relative structure was created as part of this process:
<learn title="What you will learn">
<topic name="Structure of an XForm">
<topic done="" name="<model>"/>
<topic done="" name="content"/>
</topic>
<topic name="Instance data">
<topic done="" name="internal <instance>"/>
<topic done="" name="external <instance @resource>"/>
<topic done="" name="<bind>">
<topic done="" name="@ref"/>
<topic done="" name="@type"/>
<topic done="" name="@calculate"/>
<topic done="" name="@relevant"/>
<topic done="" name="@required"/>
<topic done="" name="@readonly"/>
<topic done="" name="@constraint"/>
</topic>
</topic>
<topic name="Controls">
...
Reuse
In fact this one document ended up being used in three ways:
- list of topics that needed to be covered, that could then be checked off
one by one as the tutorial was written, as a check for completeness.
- displayed at the beginning of the tutorial as an overview of what would
be taught in the course
- at the end, displayed in a different way, as a summary of what had been
taught, allowing the reader to check each topic off as a reminder of what
had been learned
"Tutorials that include such a check-list are evaluated by attendees on
average 10% higher"
In fact this last section, allowing the attendee to check off topics
learned, was the first written, so that as the tutorial was developed, the
topics could be checked off.
Order
The next step is to decide the order these topics need to be
taught.
This was done by creating a dependency graph:
- to understand this topic, you need to know about these topics,
- to understand those topics, you need to know about these other
topics
- and so on.
This gives a partial ordering of topics, which can then be ordered linearly
at will.
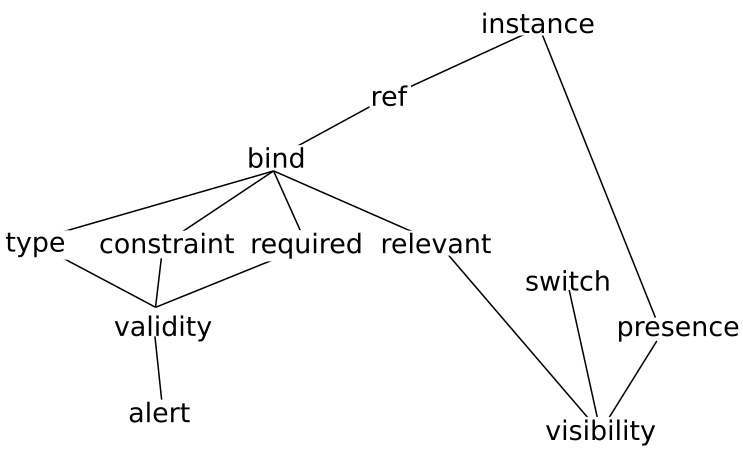
Dependencies
For example:
- to understand the
alert element, you need to know about
validity;
- to understand validity, you need to know about
type,
constraint, and required,
- to know about those, you need to know about
bind, and
ref,
- to know about those you need to know about
instance .
Progressive disclosure
It is worth pointing out that there is some leeway in even the partial
ordering that the dependency graph indicates.
Rather than completely covering all the antecedents of a topic first, you
can use progressive
disclosure.
For instance you could partially cover validity, talking only about types,
and then extend it later with constraints and required.
What the graph does reveal though is the order the partial disclosure has to
happen.
Structure
The topics were largely treated one per chapter, and in general written in
the order they would be presented.
It was attempted to make each chapter not more than one screen-full long,
around 50-60 lines of text, followed by its exercise.
Each chapter was built as a single XHTML+XForms document
- if it became too long, it could be split into two chapters;
- if a chapter was very short, or if context demanded it, two concepts
would be covered in a single chapter.
Document
An XML document was kept as chapters were written documenting the title,
filename, concepts covered, name of the exercise file, and name of the example
answer file:
<tutorial>
<entry>
<title>Introduction</title>
<file>intro.xhtml</file>
<concept>implementations</concept>
<concept>W3C standard</concept>
<concept>future</concept>
</entry>
<entry>
<title>What you will learn</title>
<file>learn.xhtml</file>
<concept>quick reference</concept>
</entry>
<entry>
<title>The structure of an XForm</title>
<file>structure.xhtml</file>
<concept>structure</concept>
<concept>model</concept>
<concept>instance</concept>
<concept>controls</concept>
<concept>XML</concept>
<concept>media type</concept>
</entry>
<entry>
<title>Data Instances and the Input Control</title>
<file>input.xhtml</file>
<exercise>input-exercise.xhtml</exercise>
<answer>input-answer.xhtml</answer>
<concept><instance resource=""/></concept>
<concept><bind ref=""/></concept>
<concept>@type</concept>
<concept>integer type</concept>
<concept>date type</concept>
<concept>string type</concept>
<concept>boolean type</concept>
<concept><input ref=""/> control</concept>
<concept><label></concept>
<concept>@incremental</concept>
</entry>
<entry>
<title>The output control</title>
<file>output.xhtml</file>
<exercise>output-exercise.xhtml</exercise>
<answer>output-answer.xhtml</answer>
<concept><output ref=""/> control</concept>
<concept>@value</concept>
<concept>XPath / @ *</concept>
<concept>count() function</concept>
</entry>
...
Navigation
This document of chapters was then used as the basis of the navigation part
of the tutorial. This was modelled on the navigation used in an earlier XForms
application, the XForms 2.0 test
suite.
A navigation instance was created containing
- a value
base that defines where the chapter files are
stored,
- a value for the filename of the chapter that is currently being read,
- a value that constructs the required URL from the base and the filename:
<instance id="nav">
   <nav xmlns="">
      <base>chapters/</base>
      <file/>
      <url/>
   </nav>
</instance>
<bind ref="instance('nav')/url" calculate="concat(../base, ../file)"/>
Navigation control
To set the filename, a select1 control is populated using the
tutorial chapters instance: the labels are the title of the chapter, and the
value is the file name of that chapter:
<select1 ref="instance('nav')/file">
   <itemset ref="instance('tut')/entry">
       <label ref="title"/>
       <value value="file"/>
   </itemset>
</select1>
Tutorial instance we saw before:
<tutorial>
<entry>
<title>Introduction</title>
<file>intro.xhtml</file>
<concept>implementations</concept>
<concept>W3C standard</concept>
<concept>future</concept>
</entry>
<entry>
<title>What you will learn</title>
<file>learn.xhtml</file>
<concept>quick reference</concept>
</entry>
<entry>
<title>The structure of an XForm</title>
<file>structure.xhtml</file>
<concept>structure</concept>
<concept>model</concept>
<concept>instance</concept>
<concept>controls</concept>
<concept>XML</concept>
<concept>media type</concept>
</entry>
<entry>
<title>Data Instances and the Input Control</title>
<file>input.xhtml</file>
<exercise>input-exercise.xhtml</exercise>
<answer>input-answer.xhtml</answer>
<concept><instance resource=""/></concept>
<concept><bind ref=""/></concept>
<concept>@type</concept>
<concept>integer type</concept>
<concept>date type</concept>
<concept>string type</concept>
<concept>boolean type</concept>
<concept><input ref=""/> control</concept>
<concept><label></concept>
<concept>@incremental</concept>
</entry>
<entry>
<title>The output control</title>
<file>output.xhtml</file>
<exercise>output-exercise.xhtml</exercise>
<answer>output-answer.xhtml</answer>
<concept><output ref=""/> control</concept>
<concept>@value</concept>
<concept>XPath / @ *</concept>
<concept>count() function</concept>
</entry>
...
Triggers
Either side of this control, are triggers that decrement and increment this
value (with judicious use of preceding-sibling and
following-sibling):
<trigger
   ref="instance('tut')/entry[file=instance('nav')/file]/preceding-sibling::entry[1]">
   <label>←</label>
   <hint><output ref="title"/></hint>
   <setvalue ref="instance('nav')/file"
             value="context()/file"
             ev:event="DOMActivate"/>
</trigger>
In this way, the user can select a chapter either from the drop down, or by
navigating from chapter to chapter using the arrows.
Thanks to how the ref on the trigger works, here referencing
the previous chapter, if there is no previous chapter, the trigger will not be
displayed.
Chapter contents
To display the content of the chapter, an html iframe is used:
<html:iframe id="chapter" src="{instance('nav')/url}"></html:iframe>
Thanks to how XForms works, whenever the file value gets
changed, the url value automatically gets updated, and so the new
chapter is displayed.
The upshot of all this is that the tutorial instance doesn't
describe the structure of the tutorial but actually defines
it. If a chapter needs to be moved, you just move it in the tutorial instance;
if a new chapter is written, it can be added to the tutorial document.
The navigation will consequently automatically be updated, and the chapter
can be displayed.
Chapters
Each chapter is thus a separate XForms document.
This has amazing advantages when talking about XForms, because the text can
actually contain the examples it is describing, rather than descriptions of the
expected output.
This of course has immense advantage: you make fewer mistakes, you can put
decisions off, or make changes easily without worrying about consistency
between text and results.
Self-reference
For example, if a chapter contains the text:
By default, outputs directly after each other will abut. If a is 3, and b
is 4, then
<output ref="a"/><output ref="b"/>
will output:
34
the underlying code is:
By default, outputs directly after each other will abut.
If a is <output ref="a"/>,
and b is <output ref="b"/>, then
<group class="pre">
<output ref="a"/><output ref="b"/>
</group>
will output:
<group class="pre">
<output ref="a"/><output ref="b"/>
</group>
In other words a really is 3, and b really is 4, and the
example output is produced by the code itself.
Interaction
But it doesn't only allow you to show what XForms does, but also allows you
to interact with the examples, and see the effect that it has:
Exercises
In some senses, finding suitable examples that are useful and expandable,
gradually adding new concepts as they were needed, was the hardest part of
designing the tutorial.
It is easy to create one tiny toy example for each concept being taught, but
more work to design ones that are meaningful and useful applications that have
the right collection of necessary concepts.
Exercise choice
The exercises are based on 5 example applications:
- a short initial 'toy' one covering two exercises introducing the basic
concepts such as instances, types, input and output,
- two large ones each of 10 exercises, both broken in the middle by a small
example.
The large applications helped with ordering the partial order of the
material, since concepts could be introduced as they were needed for enlarging
the functionality of the applications.
Application 1: Exchange rates
Display exchange rate between currencies. How to:
- load external instances over the internet
- replace instances using submission
- deal with submission errors
- generate dynamic URLs for submission.
It is broken in the middle with a small application to show how times are
manipulated, and to introduce the concept of events.
Application 2: A task list
How to:
- manipulate lists
- save data with submission
- detect when data needs saving
- automatically save data when it has changed.
It is broken in the middle with a small log-in application, that shows how
to input passwords, validate email addresses, and how to deal with validity
errors.
Server
The tutorial needs an HTTP server, and furthermore, one that supports the
PUT method: several exercises use it.
For reasons that are not entirely clear, most HTTP servers don't support PUT
at all, or only with a lot of extra work.
So the options were:
- require attendees to install an existing server that accepts PUT
- run a server and require anybody who uses the tutorial to register
- supply a minimal server that the user can easily install and use.
We opted for the third.
Own server
Luckily, writing a simple server without the industrial-strength
requirements of large-scale servers is fairly easy.
Since we had already written one for the XForms Test Suite, XContents,
a few hundred lines of C code, it was then compiled for a number of standard
platforms (Linux, Mac, Windows, RPi).
During testing, we discovered that on Windows, one virus scanner falsely
identified the server as malware, and so for the people who ran against that
problem we also wrote a JavaScript version which runs under Node.
Advantage
Since the tutorial demands a server that uses PUT, the tutorial itself could
use it for its own purposes.
In particular whenever the user navigates to a new chapter, the current
state is saved so that should the user stop and log out, on return the tutorial
is restarted at the last-used location.
Experience
At the time of writing, the tutorial has been given once, not counting a
couple of try-outs with single victims.
With only 2 hours allocated, and each exercise being budgeted for 5 minutes
presentation and 5 minutes working, only 12 of the 25 sections were handled.
Nevertheless, this wasn't seen as a problem, since the tutorial is also
designed for self-study, and so the attendees could do the rest of the tutorial
at their leisure.
The tutorial was well-received; it revealed a few places where the
exposition could be clarified, but otherwise went well.
Problems teaching remotely
Far less contact with the individual attendees, in order to solve
problems.
Less opportunity to assess if people have finished an exercise, especially
since exercises are cumulative.
Could be seen as a disadvantage of the cumulative approach, since exercises
must be completed before you can continue.
Conclusion
Designing a tutorial is a surprising amount of work.
This one was a lot of fun, being about and in XForms allowed me to submerge
myself fully in the subject.
Using XForms for the tutorial navigation introduced a large amount of
flexibility.
The rapid-fire approach seems to work well.